Tuesday, 18 February 2020

Day 13 - The starting first facial expression - Smiling

What I did today:
Today I started on the first facial expression in the animation. I'm starting with a smile looking to the side. This is a pretty basic animation so it's a good place to start. I'm doing a different facial expression for every head movement.

I used this video as a basis to learn something about facial animation and face rigs. There aren't many tutorials on how to do facial animation as it seems like it's all mostly just a process of using references and trial and error until you get the desired result.

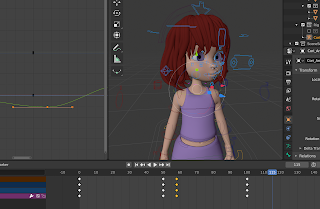
For the animation, I first decided to start with the eyes as to me this seemed like an easy place to start. For the eyes, I first wanted to start with the blinks. The trouble with this one is deciding when to have the blinks. The process of doing them isn't hard because the only thing that needs moving is the eyelids. Finding the frames where the blinks look natural is the real trouble. So to start I first decided to just create the blink animation and then move the keyframes around and duplicate them to places where they feel natural.
I first keyframed the eyes open so that I would have it for later and so I can duplicate it easier than manually moving the eyelids up and down over and over again.
I then did the same thing for a keyframe with the eyelids closed.

I then moved the first closed eye keyframe to frame 21 and then gave it a two-frame space between the closed eye keyframe and then another two-frame space for a duplicate of the closed eye frame on frame 25. This will be the blink keyframe I will have so they are fast like how a normal blink is. Due to the capabilities of my laptop the when previewing the animation because of the low frame rate the blink doesn't show up so after I finish the first facial expression I will move to my home computer which is much more capable for frame rates so that I can more easily preview the facial animations. For now, I am guessing on the timing and am hoping it is good but once I switch over it will be a lot easier to tell.
For the next blink, I added another 20 frame interval and duplicated the three keyframes and moved the duplicates to frame 40-45.
Next, I'll start with the actual eye movements.
Just like the eyelids I first selected the normal front look and keyframed that as a base.
I then went to frame 50 where the main keyframe for the neck is and by pressing "G" moved the eyes to look to the side and added a keyframe there.
I then added a keyframe of the normal eye position at frame 80 where the head looked forward again before it went the other direction.
After previewing the animation I wanted to add a bit more movement to the eyes so I moved them a bit up and a bit more to the side.
The final thing I did for today was to go along with the 20 frame interval of the first two blinks and duplicated the blinks to frame 60-65 and frame 80-85.


The framerate on my laptop is not good at all due to its capabilities but tomorrow I will switch to my better computer for the rest of the facial animations. The animations that I did finish for today I believe I did pretty well but it will be more apparent when I see it in the proper framerate.

What I'm doing tomorrow:
Tomorrow I'm going to finish the first facial expression by adding the smile which hopefully will not be too difficult. And also expand on the eyes for the second expression by adding more blinks and eye movements. I've also decided that for the second expression I will be doing a frown so that it goes to from a smile to the opposite.


Thursday, 13 February 2020

Day 12 - Adding pauses in movements

What I did today:
Today I gave pauses in the movements of the head which I noticed where needed yesterday. The pauses are meant to make the movements look more natural because I realized when looking at my reference that there are slight pauses that happen right before the head changes its motion. I'm adding these pauses by editing points in the graph editor.

I started by adding a window for the graph editor, and I started on the first movent of the head which is on frame 50. I started by experimenting with points in the graph editor to see what the best way to add the pauses in the movement.
To add the pause in the movement I first tried scaling the point by pressing "S" just like how I did in the arm movement but that was making the movent quicker so I had to try another method. So instead of scaling I decided to move only the rotation y-axis point over by 8 frames, this isn't a full 10 because then it would be too slow but 8 is just right as it gives it a slight pause.

Because of how well it worked on frame 50 I decided to use the same method on frame 100 and moved the rotation y-axis point over by 8 frames.

For the diagonal tilts, it was a bit more difficult to figure out how . to do the pauses because of the head rotated on more the one axis. First I started by doing moving just the y-axis of rotation but what that did was give a pause to the neck turning sideways but not to the tilt of the head. So I decided to move the rotation points for the y, x, and z-axis over by 8. This gave the movement the pause I wanted but what ended up happening was that the neutral position came a bit sooner which in the case actually worked out to be good thing because it made the transition between the two head tilts look more natural which was a complete accident, but a good one.
I then did the same thing on the other side but with one slight change. This was that instead of moving the rotation points over by 8 I only moved them by 6 so that there is a bit of variation in the pauses so that they all don't look the same.


Adding in the pauses seems like something small and not something worth doing but I'm glad I decided to add them because they add to the natural look of the animation and making it move in a smoother fashion.

What I'm doing on Tuesday:
On Tuesday I will start on the facial animations, which I will watch some tutorials on how to do them to help me because I have no experience doing them. To challenge myself I've decided to do a different facial expression for every head tilt so that I can learn how to do them better and to practice them as well.


Wednesday, 12 February 2020

Day 11 - Diagonal head swivels

What I did today:
Today I started doing the diagonal head swivels. These movements are harder because of having to move on more than one axis. The looking up motion is the hardest part for these movements because I have to find the right area to stop it because if I make it look too far up it will look unnatural and if it looks too much in the downwards direction then it is pretty much just another side turn.

I started off by keeping the 50 frame space and started the movement at frame 200.


To start off the movement I first rotated the neck at the y-axis and got the right rotation. The next thing I did was move the head upwards on the x-axis, to find the best position that took me a bit of experimenting because if it looked too high up then it looked unrealistic and not natural but then once I got the right location I kept it there.

I keyframed it by pressing "I" and only keyframing the neck and not the whole character.


Instead of doing the next rotation right away I decided for this segment to have a middle point between the two diagonal looks. To add this middle point I duplicated the neutral position frame on frame 150 and moved it to frame 225. The only change I made was moving the head up a bit on the x-axis. I changed it so that when the head goes to look the other way it doesn't move all the way down into the neutral setting and it moves in a very fluid motion.

On frame 250 I did the same thing that I did on frame 200 but in the opposite direction.


After playing the animation and watching the movement I decided to tilt the head a bit on the z-axis and after watching the animation with this change I liked it a lot more because of the more natural look the small head tilt gave it. 
The final thing I did was add a normal neutral position at frame 300 to give the animation an endpoint.


This is the animation so far. The framerate is because of the capabilities of my laptop but once I go to render my final animation I will do it on a much more capable device.

What I'm doing tomorrow:
As I was working today I realized that when the head moves one way before it moves in another direction there is a slight pause/ hesitation before it moves so tomorrow I will go into the graph editor and add in some hesitations to the movements, hopefully doing this will give the head movement the final bit of natural feel I think it needs. I have also decided that I will do some types of facial animation for this project. I will do some animations of the character blinking and then I will try to make different facial expressions and see how they turn out.

Tuesday, 11 February 2020

Day 10 - starting on head swivels

What I did today:
Today I started on the head animations, I started with just the side to side movements. I decided to try a different way to work on keyframing. Instead of doing all the keyframes and then doing a lot of fine-tuning I will be doing as much as I can in one section and then move on to the next section, and then if I notice later on something that I feel like needs to be changed or added it will be less work for me then. My total starting frames is 150, but I may change it as I go on.

I started off by using the neck 'line bone' to move the head

The neck is the main point the controls the heads movement so using this bone is the best method to move the head how I want it.
I first got a keyframe of just the neck at the start of the animation with it in a neutral forward position.
I then rotated the head on the y-axis by pressing R and then Y. I rotated the head slightly but not completely to the side as I don't want the animation to look forced. I keyframed it on frame 25.
I did the same thing on frame 50 but rotated the head the opposite way.

After testing out the animation it felt too fast so I decided to increase the total frame count from 150 to 300 and move the frames over so that frame 25 is now on frame 50 and frame 50 is now on frame 100. Doing this slowed the animation down to the point where it was still fast enough to look normal but also not too slow to the point where the animation looks like it's in slow motion. 

I then pressed Shift+D on the first keyframe on frame 0 and duplicated that frame to frame 150. This gives the animation a good stopping point from the side to side and a good transition point to the next section of the head going up diagonally.


This is the animation with the first section done, the framerate of the recording is a bit less because of my laptop's capabilities. The first section so far had come together pretty well.

What I'm doing tomorrow:
Tomorrow I will be working on the next section which will be a bit harder putting the head in a diagonal position because of the rotations needed. I'll try out different positions with the x and y-axis until I get the position I like.


Monday, 10 February 2020

Day 9 - New project - head animation

New Project:
For my next animation project, I'll be doing another smaller animation but it will be a bit harder than the arm animation, at least in my eyes. My next animation is an animation of a head moving side to side and diagonally up both ways, I'll probably add more as I progress.

I'm going to be doing this without a tutorial but I will be using a reference.  The reason why I'm not using any type of tutorial for the head movement is that there aren't any that I could find online, but it shouldn't be too hard and I'm confident in my ability to do this without a reference.  If I decide to do facial animations later on then I will use a tutorial for help because they are more complex and it would be easier with a tutorial.

For the head itself, I'm using a model that I downloaded off of blend swap.com
Head model link
This model instead of major bones has a more detailed rig where the bones are what I refer to as "line bones"


I decided to do this animation after a lot of research and viewing different animations made in Blender on Youtube, and decided to do an animation on heads facial movement. The facial aspect will probably be my next project after this one.

The model that I chose also took me a bit of time to pick as I wanted a model with good a good head and facial rig as I didn't want to make it myself because I do not know how to rig a character. I looked threw many different websites for a model that met my criteria and tested a few but not many where good for me to do the type of animation I want to do.

For the reference, I'm using a reference of my own head moving in the motion I want.

This is the reference I'm using, it's mostly for the basic head movement.

What I'm doing tomorrow:
Tomorrow I'll be starting the project and will start with the side to side animation of the head.


Friday, 7 February 2020

Day 8 - Finishing the arm animation and Final render

What I did today:
Today I finished up the animation for the arm and rendered it as well. For the last additions in the arm, all I did was make certain keyframes that were a bit robotic move more naturally. I'll also show how I render animations in Blender.
When the arm going downwards to the palm up position it looked a bit robotic so to fix this I deleted a keyframe on frame 60 for the bicep that I originally made as a middle spot for the arm when it was going down. Deleting this immediately fixed the problem.
There was also a small problem where the arm on frame 50 would stop very robotically and then keep moving, it only happened for a split second but it was very noticeable, so to fix it I increased the slop on the y-axis rotation point on the graph editor.
I also added in some small movements in the wrist to give it a bit more motion because I noticed that when an arm in real life does that motion, the wrist slightly moves up and down.
Once I had finished up all the small adjustments I was ready to render. To start the render process you first have to go to the output side tab that is labeled with the printer logo.
Then go down to the output tab and first change the file format to AVI Raw and then by clicking the folder logo find a place to save the animation.
Then at the top, there is a tab labeled "Render" by opening that you press render animation
Then Blender will start rendering the animation frame-by-frame and then automatically save it to the chosen save location.


This is the final render for the arm animation. I did this project to first improve my animation skills on smaller objects and then slowly move my way up to larger animations. I really like how this animation turned out even though the rig isn't the best and limited how well the hand-animated. Even threw these challenges the final product I believe looks really good and accurate to the reference I used.

What I am doing on Monday:
On Monday I will start my next project. I already know that my next project is going to be a smaller one but I'm not completely sure yet what it will be and will think more about it over the weekend. The reason my next project will be smaller will be because I still want to start off slow and make really good small animations then really poor made big ones.


Day 7 - Making better timing and looking more natural

What I did today:
Today I made changes in the pause when the hand is making the fist because previously it was forming faster then I wanted, so to fix this problem I increased the frame count at first to 200 and then to 170 after messing around with the timing. I also made keyframes of the fingers slightly bent in different areas to make the animation look more natural.

I moved the frame of the hand closing to frame 90 from frame 75 where it was before.

I also spaced out the last few frames because I wanted there to be a bit slower near the end.


I also went in at points where the fingers were straight and bent them a little because in an actual hand the fingers bend naturally. fingers aren't usually naturally straight and outstretched, so by bending them, it made the animation a bit more natural.

I did this at every major arm movement, with some being a bit more closed than others depending on how the movement is in real life.

I also bent the wrist a bit at some points such as the 90-degree point to give the arm a more lazy motion feel to it.

I also added some wrist motion in the keyframes where the arm is coming up towards the 90-degree point.

From what I did today the animation has started to look pretty good and accurate to the reference I used. It is still a bit robotic but I think that can be fixed with some movement of keyframes as well as some work in the graph editor.

What I'm doing tomorrow:
Tomorrow I'm going to be finishing up this animation and will try to make it lass robotic before I fully render it out. I will also show my process for rendering animations, and how to do it. I will also post about what my next project will be tomorrow.