Tuesday, 10 March 2020

Day 26 - adding more details to leg and waist movements

What I did today:
Today I added more details to the leg movements in the passing keyframes as well as some more waist movements that were shown in the tutorial I am using and adjusting some of the movements for the waist in the graph editor to fit my character better.

For the legs in the passing motion, I wanted it to have the movement that a real leg has. when walking where. the leg will straighten out a bit and move out just a bit before moving to the next step.
I first started on the down position on frame 4 and rotated the leg a bit so that it would be straighter when it lifts up.
I then went to the pass position on frame 7 and rotated the leg along the z-axis by pressing 'R' and the 'Z'.

After that, I moved the leg over on the x-axis just a bit. I did this by pressing 'G' and then 'X'.
After finishing the movements on the first passing and down frames I then copied the movements I made on the down frame to the foot and copied and reversed it onto the other leg.

I also copied the movements and reversed them for the movements I made to the foot on the passing position, but I made a mistake and pasted them on the wrong keyframe. I accidentally pasted them on the last high position. To fix this mistake I pressed 'Control+Z' which is the key command for undo. I then copied the movements again and pasted them and reversed them on the correct passing frame. 


For the waist I wanted to make it so that on the passing frame the waist moved over a bit, to give the look that the body was putting more weight on the stepping foot. To do this I went to the passing frame on frame 7 and shifted the waist on the x-axis just a bit.
I then copied, pasted and reversed the movement onto the other passing frame.


To make the waists side to side movements for the weight transfer look smoother I went to the graph editor and removed all keyframes that weren't on the initial contact frames at the start and end or any keyframes that were on the passing frame. I also added a cycles modifier to the motion as well so that the movement would loop nicely.

The last thing I did today was something that was not in the tutorial. I chose the pelvic control and wanted to fix its z-axis rotation. I wanted to do this because the waist was moving outwards on the walk a bit too much that made it look exaggerated and not fitting for the character. To fix this I went to the graph editor and chose the z-axis rotation for the pelvic control and made the movement smaller then they were before. I did this by pressing G and moving the contact position keyframes at the end and start downwards. I also did the same to the contact position in the middle but instead of moving it downwards I moved the keyframe up to make the curve smaller. Doing this made the movement less exaggerated and better for my character.


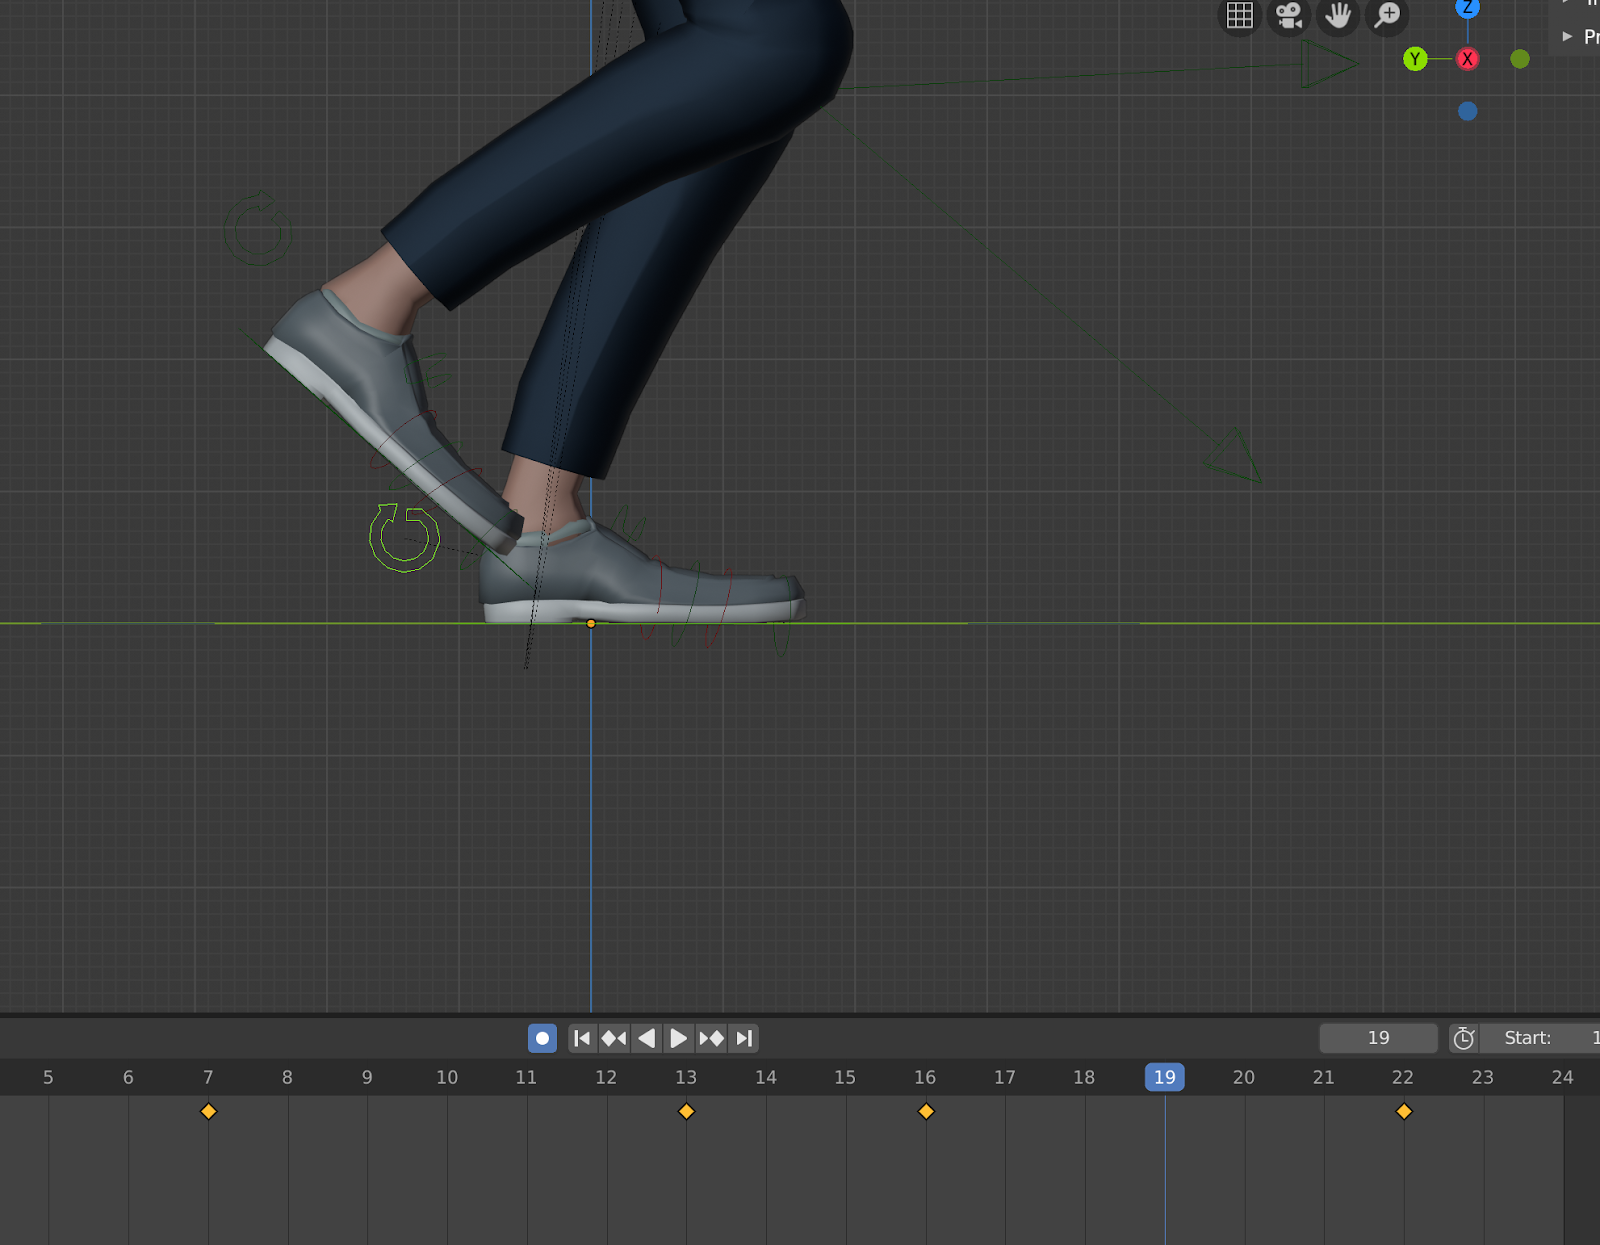
This is the lower part of the animation, which for now is finished. So far the animation is coming together very well and is looking like a good walk animation.

What I'm doing tomorrow:
Tomorrow I will start on the upper body portion of the animation.


Monday, 9 March 2020

Day 25 - Fixing the transition to the leg passing

What I did today:
Today I worked on the positioning of the foot and leg on the leg passing when the walk is going from one step to the next.

I first started on the down position keyframes because the leg from the contact position to the down position was moving forward, which it shouldn't be doing because when moving in a walk first the foot lifts up before moving forward while in the animation the leg was moving forward at the same time as the foot going up.
To fix this, I first undid the rotation to the ankle on the down frame by pressing 'Alt+R'
I then selected the general foot bone and rotated it so it would be as if the foot had just lifted up. I then moved it back to the same distance where the foot is on the contact position but just a bit forward. All of these movements were done on the first down position which is on frame 4.
I then went to frame 7 which is the passing frame for the leg.
The leg was too far back than where it should be so I moved it up and forward just a bit. I also canceled the movements the ankle had by pressing 'Alt+R', I didn't change it after that because the reset put it to a good position that fit the movement.
I finished the leg pass on one foot so to get it on the other foot in an easy manner, I copied the motions I did first on the down position for the ankle and leg, and then 'Shift+Control+V' which pastes the movement and flips it so it's on the other leg. I pasted the movements on frame 13 which is the down position for the other leg.
I then did the same for the movements I did to the leg and ankle on frame 7 which is the first passing frame and pasted and reversed it on frame 16 which is the opposite legs passing frame.

What I'm doing tomorrow:
Tomorrow I will do the final bits for the leg motions that are said in the tutorial which will be adding a bit more extra details in the foot movements and waist movements. After finishing up what the tutorial shows for the lower leg motions I will adjust some of the movements to fit my character a bit more.


Friday, 6 March 2020

Day 24 - Up position and more hip movements

What I did today:
Today I added the keyframe for the high point in the walk as well as worked on the hip movements while the character is walking which I learned to do by following the tutorial I have been watching.

For the up position, I first started by looking at the point the torso was at on frame 13 which I used as a reference. I knew that the high point in the walk needs to be just slightly above this point.
Then on frame 10, I moved the torso up just a bit more then it is on frame 13, I tested going higher than this but this height seemed the most fitting to the animation.

I then copied the pose on frame 10 of the high point and copied it onto frame 22 which is the high point for when the other leg is in the front of the body.

Next, I opened the graph editor and selected the pelvic muscle which controls the hips, for the hips, I am only focusing on the z-axis rotation which controls the sway of the legs and the y-axis rotation which controls how the legs turn when walking.
On the side of the graph editor, there is a small arrow, by dragging the arrow you get a f-curve tab.
Then on the new side panel, I clicked on the modifiers tab.
I then pressed the 'add modifier' and added a cycles modifier. What this does is that it repeats the movements of the hip threw out the graph which leads to a better loop. I did this first to the z-axis rotation curve.
For the y-axis rotation, I did the same thing but I then selected all of the keyframes in that curve and pressed 'G' and then 3 which moved all the keyframes for that rotation over by 3. I did this so that the down point in the weight of the legs corresponds to the body's down position in the walk cycle.


This is the animation so far, right now it is slow just due to the size of the character which slows down my frame rate.

What I'm doing on Monday:
On Monday I am working on the foot passing points, so when the foot is passing to do the next step in the walk. I will be adding more movement and adding more realism to the movement of those passing points.


Thursday, 5 March 2020

Day 23 - hip motions and down position

What I did today:
Today I continued to work on the animation and. followed the tutorial, I moved the hips so that they would move with the legs when walking as well as making the down position from the reference.

I first started by tilting the. upper body forwards a bit because when humans walk we are leaning forward a bit.

I then rotated the pelvis forward a bit so that it would seem like the body was putting more weight on the contact foot.

I then tilted the hip to the side a bit just like when normally walking our hips shift because the weight of our body is shifting from one leg to the other.

I then copy and paste the pose of the upper body and hips onto frame 25 as well as copy, pasting and reversing the pose on frame 13.

Then to start the down position I first rotated the foot back down onto the ground, just like the reference.

I then copied this on frame 10 so that the leg wouldn't raise back up because it is not changed on frame 13.

I then repeated this on the opposite leg on frame 16 and 22.

For the down pose, I then moved the upper body down a bit for the down pose and make it look like the front leg was taking most of the weight.

I then copied the move onto frame 16 for the other leg.

What I'm doing tomorrow:
Tomorrow I will continue on finishing up the down pose and also work on the up pose as well. I will also keep following the tutorial, as even though I am using a different model then the one in the tutorial it is helping me with the movements, I am just shifting the movements to fit my character better.


Wednesday, 4 March 2020

Day 22 - Starting the walk animation

What I did today:
Today I started following the tutorial on how to do the walk cycle.
Before I started however I noticed a problem with the model I had chosen. The problem was with the rig as it the leg bones for the rig had not been made properly and were not producing the results I wanted for the motion of the legs. So to fix this I looked for another model with a good rig and I found a model from Blender Cloud.com this rig is actually for a character that was used by the official Blender demo real for one of there updates so it is very well made.
This is the model I have started using now.
The animation will be 24 frames long.
I also discovered the auto-keying feature, which is where the model will automatically keyframe on when I am moving the model. This is done by pressing the circle button just above the timeline beside the animation controls. 

For the animation itself, I started by creating the first contact points. As shown by the reference.

I first started with the characters "gate".  A gate is something every person has and it is different for males and females. A gate is the neutral position of a person's hips which corresponds to the neutral position of there legs. For males, the gate is a bit further apart with the feet pointed a bit outwards like the bottom of an"A". While for females, the gate is closer together in a more closed "V" position. Because my character is a male the gate is a bit further apart.

I then went to the side position and moved the front leg forward by pressing 'G' and locking it to the y-axis by pressing 'Y' right after. Doing this moved the leg forward from its neutral position and up a bit. I then did the same thing for the back leg.

I then rotated the foot of the character up a bit and then by selecting the main torso control I moved the character down a bit until the character heel touched its restricted 'ground' area. I moved it down until the front leg bent just a bit.

Next just like the front legs foot, I rotated the back legs foot downwards till it touched the ground and caused the knee to bend a bit.

I then selected everything that I moved on frame 1 and pressed 'controlC' this copied the movements I did on frame 1 onto my 'buffer' which is just Blenders version of a clipboard. I then went to frame 25 and pressed 'controlV' to paste the copied actions to that frame. I did this so that both the end frame and beginning frame have the same keyframes so that it loops better. Having it loop seamlessly is another reason the action is copied to frame 25 which is outside the frame total. 

I then went to the middle frame which is frame 13 and pressed 'ShiftControlV' which pastes the actions from frame 1 and 25 but flips it so that the legs are doing the opposite than the other frames.

Here are better views of the flipped legs with the first screen capture being frame 1 while the second is a screen capture of frame 13.

What I'm doing tomorrow:
Tomorrow I will work on some of the hip movements of the character for when it's walking as well as starting on the down position shown in the reference.


Starting new walk animation

What I did today:
Today I started on my new animation project which is a walk animation cycle. To start today I researched videos online and references for the animation, as well as finding the model.

For the tutorials I will be using I chose a good playlist of tutorials on youtube that I found.
This is part 1 of the playlist series I found.

For the reference, I am using a photo of a walk animation breakdown reference I found.
This reference can be mostly used for 2D animation but it is very useful for 3D animations as well, because in a walk animation there are the same key points of a walk.

For the character I found this good rigged character on Blend swap.

What I'm Doing tomorrow:
Tomorrow I will be starting the walk animation by watching and following along with the tutorial I found on youtube.


Monday, 2 March 2020

Month 2 plan

Month Plan:
For my next month of posts, I will keep working on animations of humans, and human movements. I want to improve the movements and animations I create so they look as natural as possible. I will keep using Blender as my main program because I want to keep learning more about it and the functionalities of it because it will make transferring over to other programs much easier later because of how similar Blender is to most industry-standard programs. I'm hoping to get Maya later on in the year, which is an industry-standard animation and modeling software much like Blender. The reason I want to get Maya is that next year at Vancouver Film School it is the main program for animation used there.

My Next Project:
The next project I have decided will be a walk cycle of a person, which I am hoping to later improve to a run animation. For this animation because it is more complicated then the other animations I've done I will be using more references as well as using video tutorials on how to make walk animations, and later on, run animations.