Wednesday 29 April 2020

Day 36 - Spider-man Scene - Making a path to follow

What I did today:
Today I worked on adding a path that the Spider-man model will follow in the scene and having the model snap to the path.
To start adding in the path I first pressed 'SHIFT+A' and added in a Bezier curve into my scene.
I then scaled up the curve and rotated it to follow the path I wanted.
Once rotating it straight so that it follows the downward path of the street I then went into Edit mode by pressing TAB and by selecting the individual points of the curve I rotated it and moved those individual points to create different levels of height to the curve that the model will follow.
Once I got the end of the curve which is the point selected in the screenshot and had made all the changes to the curve beforehand, I needed the curve to be longer for the final parts of the animation, and so to do this I selected the end part of the curve and then pressed 'E' to extrude the path and make it longer and then rotated and moved the extra point the way I needed it.
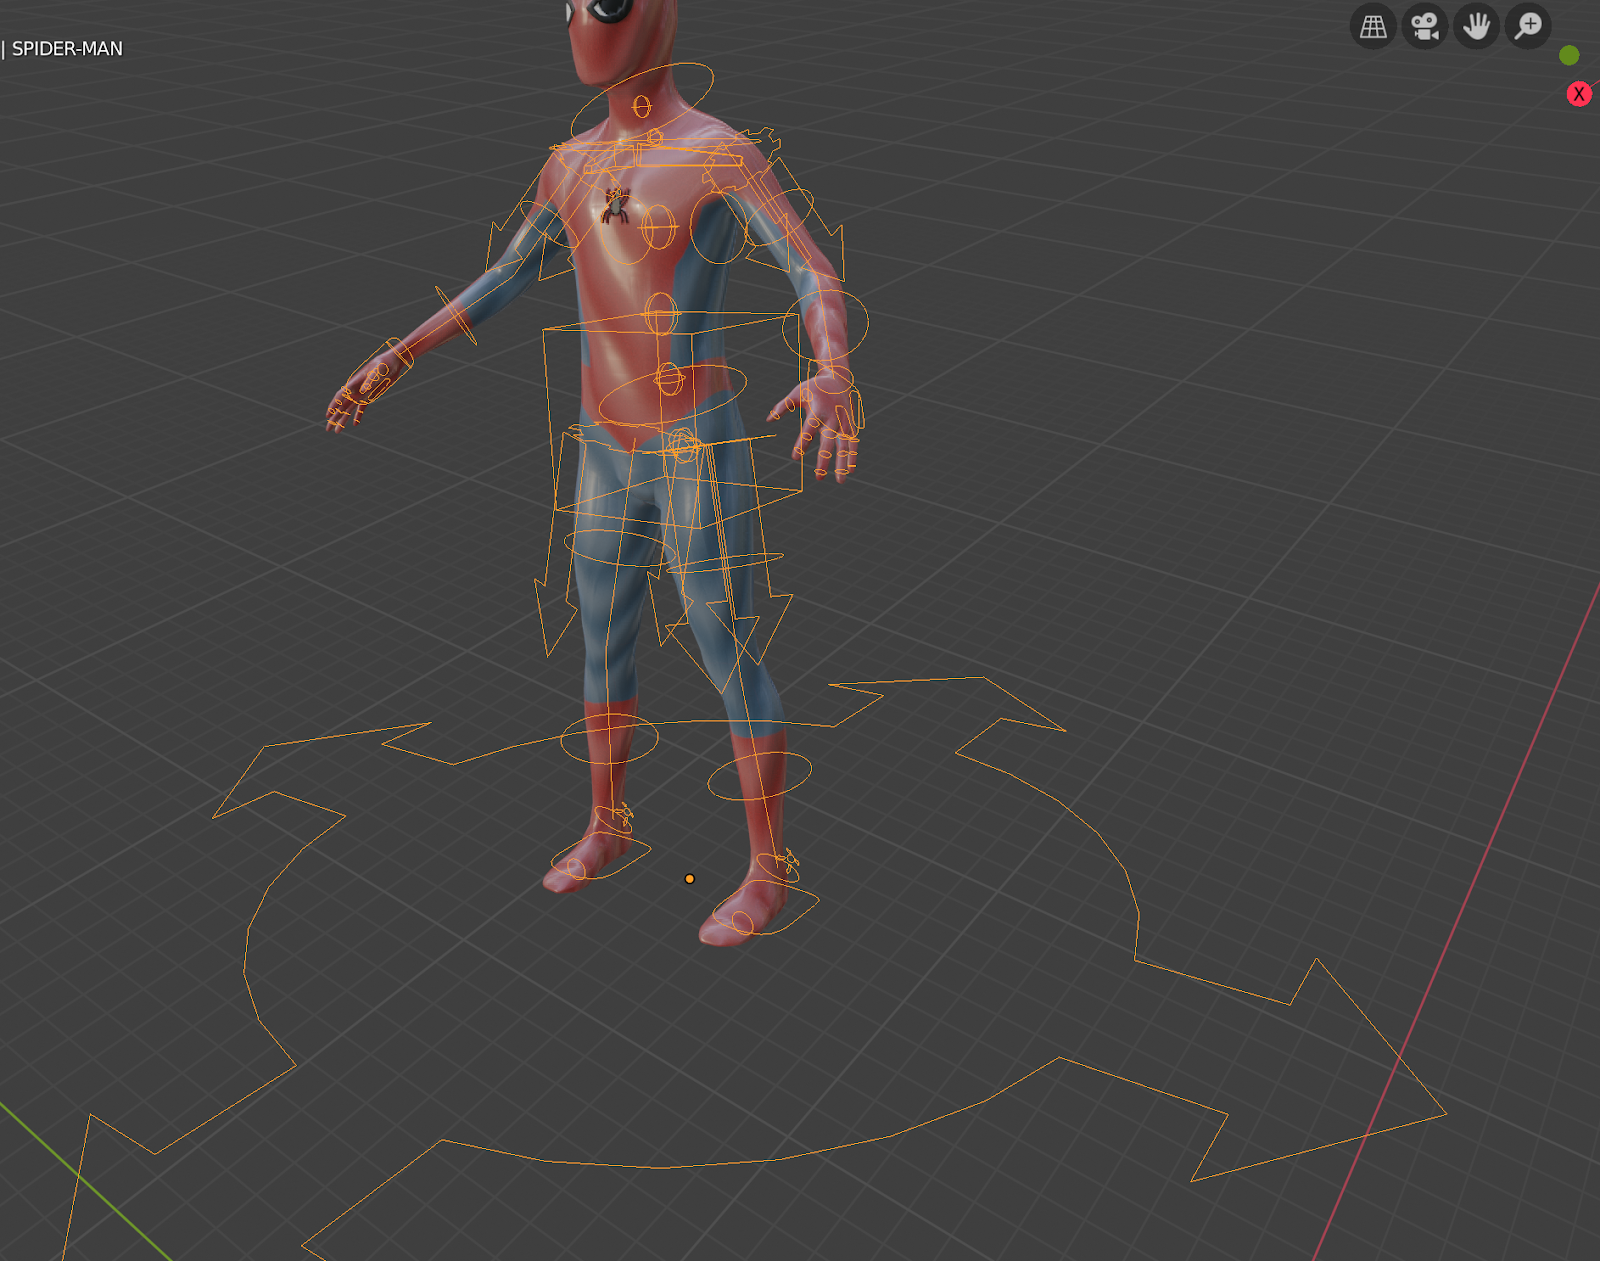
I then started on the next portion which is to have the model be connected to the path so that when I animate it, it follows the path. I first started by importing in my model with its rig.

I then went into pose mode for the rig and selected the main hip control which is also the center of the model. I then pressed 'SHIFT+S' to open the cursor wheel which moves the 3D cursor to a location. I then chose the 'move cursor to selected' option.

I then went back into Object Mode and pressed "SHIFT+A' and went to the 'empty' options and brought in a Plain Axis. By moving the 3D cursor to the center of the model before it made it so when I brought in the Plain axis it came in at the center of the model. The reason why I need the Plain axis is that in Blender there is a problem where when moving the character through a path, the character becomes buggy and the rotation keyframes become augmented, and so to fix this adding in a Plain axis is beneficial because I can connect it to the model and add in the large body rotations to that which fixes the problem and so that none of the other animations I make to the body are affected.
To connect the Plain axis to the model I just select the Plain axis and rig and then press'CTRL+P' and select the option with 'keep transform'. Doing this connects the two and makes it so that any rotation or movement I make to the Plain axis will move the overall body with it.

I then selected the Plain axis, which I labeled 'Spider-man Empty', and then went to the Object Constraints panel on the side and added a new constraint. Because I wanted the empty to follow the path I chose the 'follow path' option when adding the constraint. I then went to the 'Target' setting in the constraint I added and chose the path I had made beforehand which I labeled with 'Spider-man Path'.
After doing this, the model automatically moved to the start of the path where I wanted it.

What I learned today:
Everything I did today was completely new to me because I had made animations of characters before where they moved but never of a character actually changing positions in a scene and going from point A to point B. So following the tutorial I'm using helped me a lot and taught me a lot about it and how I could possibly use it for later animations.

What I'm doing tomorrow:
Tomorrow I will start working on some of the basic rotation animations for the scene such as how Spider-man's body will be rotated when he swings around the building or when he does a backflip how much does he need to be turned upside down. Because I'm doing the just the main rotations I'm mostly only going to be using the Plain axis I made for the very purpose of the main body rotations. I will also be figuring out the length of the animation and setting an end in the frames.


Day 36 - Spider-man scene - setting up buildings for environment

What I did today:
Today I started on the big Spider-man scene I'm doing for my next project. Before I do any animation for the scene I have to set up the environment I'm going to have for it because unlike the other scene where a static setting was ok to do, for this project it is a full dynamic scene so I need to set up a good environment.
I first started by creating a new blend, and then importing in the building assets I downloaded from the youtube tutorial. I then started to arrange them how I wanted it to be in the scene following the tutorial.
This was the end result and layout I made. It's a long street with two intersections with the middle intersection hopefully being close to the middle point of the animation and the second intersection being where the animation ends. To get multiple buildings I selected the building I wanted to have more of and then pressed Shift+D to duplicate it. There is a variety of different size buildings in the original assets that I imported, but for the scene I wanted more variety and so when I would duplicate some of the buildings I would edit them to make them larger or smaller.
When making changes to the buildings I would first raise the roof part of it because the building models I downloaded all have separate roofs for the reason of editing the height of the buildings. I would raise the roof by just pressing 'G' and then while pressing 'G' I would press 'Z' so that it would stay on the z-axis and not shift from the center of the building.
After getting the roof out of the way I would press 'TAB' to go into Edit Mode which lets me edit anything for the model I am working with. When going into edit mode it shows all the vertices, faces, and edges on the model that I can use to shape the model however I want.

Then I wanted to select a portion of the building. To do this I first just box selected a small part of the model and then pressed 'CTRL+L' to select a segment of the building. I then either duplicated that segment to make it taller or deleted that segment to make it shorter. I then just placed the roof back on top of the building. I did this for each building that I wanted to change so that I could successfully make a variation in the buildings for the scene so that when the animation plays, the environment does not look identical to each other.
After doing this to most of the buildings, I just set up the layout I wanted.

What I'm doing tomorrow:
Tomorrow I'm going to import the Spider-man model and then also set up a path for the model to follow when it is moving.

Friday 24 April 2020

Day 35 - Starting new project

What I did today:
Today I decided on my next project which will be the spiderman swinging scene that I was thinking about doing in my last post. I am doing this scene because I want to challenge myself with something big as I can learn more from doing something big and finding out about new techniques and using them right away, rather than learning small things one at a time over time. This way, I will know what important things I should practice in my animations to get better.

For the project, I started by going to the video and watching through part 1 first where he explains the rig and background in detail. He also put the assets in the description of the video to download so I did.

This was the link in the description.
 https://www.youtube.com/watch?v=H_b9fpRn9cE - this is the link for the video.

After downloading the rig, I played around with it for a bit and played with the controls a bit to get used. to them. I also put all the bones to FK instead of IK in the rig setting. I did this because IK bones are locked in the position where they start and don't move with the body when a larger part of the bone is moved. While with FK bones the bones will move with the rest of the body. For example, if the arm is IK and the rest of the body is FK then if I moved the body forward by selecting the torso then the arm would not follow and would stay where it is. Which. is why I changed the bones to FK because I want the body to move together because the scene requires everything to move quickly, together and smoothly.

What I'm doing on Monday:
On Monday I will start on the animation and follow along with the tutorial.


Wednesday 22 April 2020

Day 35 - Final renders and what I learned from this project

What I did today:
Today I did the final renders for my walk animation, for this render I changed one thing which was instead of rendering into an FFmpeg video I rendered it into an AVI video, just because the final product ends up looking better and it renders quicker.
Final render and what I learned:
In the final render, the jerkiness in the legs that I noticed from before is fixed but there is another problem now where it in the middle where I duplicated the keyframes to make it longer it lags a bit and is a little jerky. The eyes have improved a lot more but they still move very fast but they are not as jerky. I didn't fix this problem now because I don't want to spend too much time on this project. This project did teach me a lot about animating movements with body parts. I used calculated paths for the first time to use as tools for timing and how fast or slow or delayed the movements are. I also learned that it is very tough to animate a face at the same time as a fast movement that isn't in a large timeline. For example, the animation I did that only focused on the face before this had more close to 300 frames from what I remember while this one only had 42 which made it much faster. I also for the first time used a rig that was very user friendly and that had shortcuts for the animater to move multiple body parts at the same time.

What I'm doing tomorrow:
Tomorrow I'm going to start a new animation, which right now I'm thinking of doing a scene from a youtube tutorial I found of Spider-man swinging through the city.

This is the animation I'm thinking of doing. The reason I want to do such a big scene is that I can challenge myself with something big instead of doing more small animations.

Tuesday 21 April 2020

Day 34 - Fixing leg movements and refining animation in graph editor

What I did today:
Today I worked on refining the animation in the face by using the graph editor and then also fixing the jerkiness in the legs that I noticed when I rendered the animation.

For making the animation in the eyes smoother, I went into the graph editor and deleted some of the unnecessary keyframes so that the graph would be smoother as well as making a cycles modifier to all the z-axis location keyframes to make it repeat and loop properly.

I then did the same with the eye movement but I didn't add a cycles modifier because it didn't need to repeat because it was more random than the blinking is.


For the legs, the reason it was snapping so much in the animation was that there wasn't enough space between the keyframes for it to automatically move properly and reach the keyframe smoothly. 

To fix this problem I moved over the keyframe on frame 19 over to frame 20 and made another keyframe on frame 18 with the leg moved forward a bit to make up for the computer automatically snapping the leg too much. I then did this for the rest of the leg keyframes and when testing it out in the preview, it seemed to fix the problem. I didn't go into the graph editor because the legs moved fast enough that any small snaps that may still be there will be unnoticeable due to the speed of the movements.

What I learned today:
I learned that the computer sometimes doesn't make the right assumptions to move a piece towards a keyframe and to fix this a manual keyframe needs to be made.

What I'm doing tomorrow:
Tomorrow I'm going to render the animation and summarize this project as well as what I will be working on next.


Day 33 - Fixing problems found in render

What I did today:
Today I started on fixing some of the issues that I found from rendering. I started with the eyes and the duration of the animation because they seemed very jittery and the character was blinking too often.

To lengthen the duration of the animation I changed the frame end to 48 and then duplicated every keyframe over with frame 26 being the start of the duplicated portion of the animation.

After duplicating I realized there where some keyframes that were there, after the ending of the walk that was added due to the cycles modifier to the waist animation in the graph editor. so to fix this I changed the end frame to 42 instead of 48. 

Then to fix the blinking issue I went to the eyelids keyframes and deleted some keyframes for the blinks that I thought weren't necessary.

I also lengthened some of the opened eye portions of the blink and moved over the closed portion of the blinks so they happened sooner.


I then also got rid of some of the random eye movements to get rid of the jitteriness of the eyes, as well as moved over some keyframes for the eyes so they moved at different times to also help fix the problem. While I was doing the eye movements I also got rid of the small open teeth smile that I had in the middle of the mouth animation because in the animation I noticed that it wasn't very noticeable and went by too quick.

What I learned today:
Today I learned that it is very hard to match the facial movements to the body movements in a set amount of frames because the timings for the two are completely different.

What I'm doing tomorrow:
Tomorrow I'm going to fix some of the jerkiness in the leg movements as well as refine the facial animations by going to the graph editor.

Thursday 16 April 2020

Day 32 - Fixing minor problems before rendering

What I did today:
Today I worked on some problems I was having with the torso rotation where the torso was rotating one way but not the other way. After I finish this I'm going to render the animation and then watch it to see if there's anything I can improve.

In this screenshot, the rotation of the torso is to the left but the problem is that after the middle contact position it should move back towards the right but it doesn't do that which is what I need to fix.
To fix this problem I went to the graph editor and chose the y-rotation of the torso and increased the size of the ends that make the torso rotate right and reduced the left rotation which seemed to fix the problem of the torso rotation.

Next, I moved onto the rendering of the animation.
For the render, I unhid the background and camera control so that I could position the camera where I wanted it, and I chose to do a position that shows the full body moving.

For the render itself, I went to the output settings tab on the side and chose my location for the render as well as choosing my file format which I set as an FFmpeg video. I also set my fps at 60 frames but depending on the animation I may change that later to see the difference between 60fps and 30fps for the animation. I then went to the top left corner and clicked render animation.


Watching the rendered animation I realized that the blinking was too fast and too often, the same thing with the eye movement being too fast, so I will need to fix that, as well as the legs beings a bit jerky in the movement which can probably be fixed by going to the graph editor.

What I learned today:
I learned that the best way to tell if there are mistakes in the animations I make is to view them fully rendered, as that is the way other people will view them and the speed that I view the animation in Blender is different then the speed that the rendered animation plays at. By viewing the animation rendered first before finishing the project I can see mistakes I may have missed without doing that, such as the fast blinking and eye movement I would've missed if I hadn't rendered a test version first.

What I'm doing tomorrow:
Tomorrow I will work fixing the mistakes I noticed such as slowing down the blinking and eye movements.

Wednesday 15 April 2020

Day 31 - Eye motion and facial expression

What I did today:
Today I worked on adding facial expressions and eye movements to the character.

I started on adding blinks to the character, and to start I added a starting position for the eyelids as well as copying that same position to the end so it looped well.

I then created a keyframe on frame 3 of the eyes closed and then went back and forth between the closed and opened eyes for every second frame.
Because the blinks were very close together and looked very fake I added some pauses in between the blinks and to do that I just got rid of some of the blinks to create a bit more of randomness to it.

Then so that the character wasn't repeatedly just staring in one direction, I made him look around and made it a bit random by adding some long looks to the side while also adding smaller looks around.


I then added a smile to the start and end of the animation so that the character isn't dead faced the entire animation as well as adding a small smile with the teeth showing in the middle of the animation to add some more variety.

What I learned today:
Today I learned that some models also have controls that join the eyes together so that they can move in unison instead of having to move each eye individually.

What I'm doing tomorrow:
Tomorrow I'll be refining the animation a bit more, and fixing some problems I saw with the torso before doing a test render to see what it looks like, fully rendered.


Tuesday 14 April 2020

Day 30 - Left arm motion and hand animations

What I did today:
Today I worked on adding in the motions for the left arm as well as adding in small animations for the hands so that they are not static the entire time.

I first started by getting rid of the figure-eight markers for the right arm so that it wouldn't get in the way of the animation of the left arm.
I then turned off auto keying so that I would not make unnecessary keyframes, and then went to the middle contact position on frame 13 and moved the arm backwards, so that it would be the opposite from the other arm. I then keyframed the position and only keyframed the rotation.
I also copied the starting position and pasted it onto the end frame which is frame 25.
The hand for the end and starting frames was in an awkward position and didn't look good, so I moved it slightly forward so that it would sway back and forth when the arm was moving. I then copied the hand movement that I made onto the starting position.

I then learned that when I moved this handle control that is connected to the hand with the 'G' key it moves all the finger keys simultaneously, which makes it easier than moving the fingers individually.
Once I learned this I slightly bent the fingers on the left hand and made keyframes on the first and last keyframe, as well bending the hand just a little more on the middle contact position, so that it isn't static when moving.
I then repeated the same thing on the right hand.
Then to finish it, I went to the graph editor and deleted some of the unnecessary keyframes to make the graph smoother and so it isn't as jerky.

The reason I animated the left arm in a different manner then the right arm was to see if I could do a simpler way to animate the arm. The right arm is more refined in its movements and timing, while the left arm is simpler and is the general movement with some refinement but not as much as the right arms.

What I learned:
Today I learned about the hand control that controls all the fingers at the same time, which made making the hand animations a lot easier than doing each finger one at a time.

What I'm doing tomorrow:
Tomorrow I will work on some of the facial expressions and add some animations to the head.